How to Winterize a Boat for Storage: Complete Step-by-Step Guide
By FindBoatStorage Research Team · Published February 2026 · Based on verified data from our directory
Winterizing your boat before placing it in storage is one of the most important things you can do as a boat owner. Skipping this process can lead to thousands of dollars in freeze damage — cracked engine blocks, burst water lines, mold, and corroded electrical systems. Even if you've winterized the same boat a dozen times, a structured checklist keeps you from missing a single step in the process.
Whether you're storing your boat outdoors, under cover, or in a climate-controlled facility, proper winterization protects your investment through the cold months. This guide covers everything from engine prep to hull protection, with separate guidance for outboard vs. inboard engines, gasoline vs. diesel, and powerboats vs. boats with freshwater systems onboard.
Why Winterizing Your Boat Matters
Water expands when it freezes. Any water left in your engine, plumbing, or livewell can crack metal and plastic components with enough force to be irreparable. Even in southern states where temperatures rarely drop below freezing, a single cold snap can cause damage that isn't discovered until spring launch — when repairs are expensive and you've already missed weeks of the season.
Proper winterization also prevents:
- Mold and mildew from moisture trapped in the cabin and upholstery
- Battery failure from sitting uncharged for months (batteries left connected lose charge and sulfate)
- Fuel system corrosion from unstabilized gasoline breaking down and leaving gummy deposits
- Pest infestations from rodents nesting in the cabin, bilge, and engine compartment
- Canvas and upholstery degradation from UV exposure, bird droppings, and moisture infiltration
The cost of proper winterization — including supplies and time — typically runs $100–$400 for a DIY job, or $300–$800 for a professional marine winterization service. Compare that to a cracked engine block repair starting at $2,000–$6,000 and the math is obvious.
Step 1: Flush and Drain the Engine
This is the most critical step and differs significantly based on your engine type.
Outboard Engines
Run the engine with fresh water using a set of flushing ear muffs connected to a garden hose. Run at idle for 10–15 minutes to flush out salt, sand, and debris from the lower unit and cooling passages. After flushing, tilt the motor to its fully down position to allow residual water to drain from the water pump housing. For saltwater boats, this step is essential — salt residue causes corrosion that progressively destroys internal components.
Inboard and Sterndrive Engines
Close the raw water intake seacock, connect a garden hose to the raw water intake fitting (or use a dedicated flushing port), and run the engine until the thermostat opens and warm water flows throughout the cooling system. Then systematically drain all water from:
- Engine block drain plugs (both sides)
- Exhaust manifolds and risers
- Heat exchanger and oil cooler
- Raw water pump and filter housing
- Any through-hull fittings connected to the engine
Pro tip: After draining, pour non-toxic propylene glycol antifreeze (NOT automotive antifreeze — it's toxic to marine environments) into the water inlet and through the cooling system to protect any water that resists gravity draining. This is especially important in manifolds and risers that have complex internal geometries.
Diesel Engines
Diesel engine winterization follows the same cooling system process but has additional considerations. Diesel fuel is more stable than gasoline over winter, but the fuel system should still be checked for water contamination using a water separator. Bleed the fuel system in spring if the boat sits for more than 6 months. Change the racor/water separator filter before storage if it's been 150+ hours.
Step 2: Stabilize the Fuel System
Old gasoline breaks down within 30–60 days and leaves gummy deposits that clog fuel injectors, carburetors, and fuel system lines. Degraded fuel is one of the leading causes of spring start-up failures.
- Fill the fuel tank to about 95% capacity — a full tank minimizes the air space where condensation can form, reducing water contamination risk
- Add marine-grade fuel stabilizer according to the product directions (typically 1 oz per gallon)
- Run the engine for 10–15 minutes to circulate treated fuel through the entire system, including injectors or carburetor
- For carbureted engines: after running with stabilizer, turn off the fuel supply and run the engine until it stalls — this clears raw fuel from the float bowl that would otherwise degrade over winter
- For fuel-injected engines: running with stabilizer in the tank is sufficient; no need to run the carburetor dry
Step 3: Change the Oil and Filters
Used oil contains acids and combustion byproducts that accelerate corrosion of engine internals over a long storage period. Always change the oil before winter storage, not after — you want fresh, neutral-pH oil protecting the engine through the idle months, not acidic used oil.
- Run the engine briefly to warm the oil — warm oil flows more freely and drains more completely
- Drain the old oil fully and replace the oil filter
- Refill with the manufacturer-recommended oil weight and type
- Run the engine for 60 seconds to circulate the new oil and pressurize all bearing surfaces
- For sterndrives: also drain and replace the lower unit gear lube — used gear oil contains water contamination from the impeller seal that can corrode internal gears over winter
Step 4: Fog the Engine Cylinders
Fogging oil coats the internal cylinder walls, pistons, piston rings, and valve stems with a corrosion-resistant film that lasts through the storage period. This step is especially important in humid climates or when storing outdoors.
For outboards: With the engine running at idle, spray fogging oil into the carburetors or throttle bodies until the engine begins to smoke and then stalls from the excess oil coating the combustion chambers.
For inboards: Remove the flame arrestor and spray fogging oil directly into the carburetor or air intake while the engine is running at idle. Do this until the engine stalls. Alternatively, remove the spark plugs, spray a small amount of fogging oil into each cylinder, and crank the engine briefly to distribute it before reinstalling the plugs.
Step 5: Protect the Water Systems (Boats with Freshwater Plumbing)
Any boat with a cabin, head (marine toilet), galley, or livewell has a freshwater system that must be winterized completely to prevent freeze damage.
The process:
- Turn off the water heater at its breaker and allow it to cool before draining
- Open all faucets to their full open position before draining
- Drain the freshwater tank completely using its drain fitting
- Run the water pump briefly to clear residual water from pump housing and lines (then turn the pump off once pressure drops)
- Pump non-toxic RV/marine antifreeze through the entire freshwater system: run each faucet until antifreeze (pink liquid) appears — hot and cold sides separately
- Flush the head (marine toilet) with antifreeze: pour it into the bowl and pump it through both the discharge line and the intake
- Drain or antifreeze the livewell and bait well lines
- Empty and leave open the ice maker if equipped
Step 6: Battery Care
Batteries left connected will slowly discharge through normal parasitic draws (bilge pump float switch, clock, radio memory). A fully discharged battery sulfates — lead sulfate crystals form on the plates and permanently reduce storage capacity. This damage is irreversible.
- Disconnect the negative terminal (or engage the battery disconnect switch if installed)
- Clean the terminals with a baking soda and water solution on a wire brush — remove any white corrosion buildup
- Apply dielectric grease to terminal connections to prevent future corrosion
- If storing in a region with hard freezes: remove batteries and store them indoors above freezing — a discharged battery can freeze and crack its case
- Connect a smart trickle charger (battery maintainer or "battery tender") to maintain optimal charge throughout storage — do NOT use a standard charger unattended
- Check battery voltage once a month if you can — a fully charged 12V battery should read 12.6–12.8V
Step 7: Clean and Protect the Interior
A sealed, damp boat interior is a mold factory. Spores that develop over winter are not just unsightly — some species produce allergens and odors that are difficult to fully remove from porous materials like foam cushions and carpet.
- Remove all food, drinks, condiments, and any organic matter from lockers and the bilge
- Deep clean all upholstered surfaces with a marine fabric cleaner and allow to dry fully before closing the boat
- Wipe down hard surfaces — counters, helm, dashboard — with a mild cleaner
- Clean the head fully, including tank treatment if your system uses a holding tank
- Leave all cabinet doors, lockers, and drawers slightly open to allow air circulation
- Place moisture absorbers (DampRid, silica gel packets) throughout the cabin — replace mid-season if possible
- If the boat will be sealed tightly under a cover for 6+ months, leave a small screened vent opening to prevent a completely stagnant air environment
Step 8: Protect the Exterior and Hull
The hull and topside surfaces take the brunt of outdoor winter conditions — UV, freeze-thaw, bird droppings, and air pollution. A clean, waxed surface is dramatically easier to maintain over multiple seasons than one left uncared for.
- Wash the hull and topside thoroughly — remove dirt, algae, and any biological growth before waxing
- Apply marine-grade wax to all gelcoat surfaces — wax acts as a UV barrier and prevents oxidation from setting in over winter
- Clean the bottom — remove barnacles, algae, and other growth from the running surface; this is the right time to inspect for blistering in the gelcoat and address it before storage
- Apply bottom paint if needed before storage if the boat will return to wet storage in spring — the paint needs to cure before immersion
- Inspect and treat all stainless fittings — apply a corrosion inhibitor to cleats, rails, and hardware
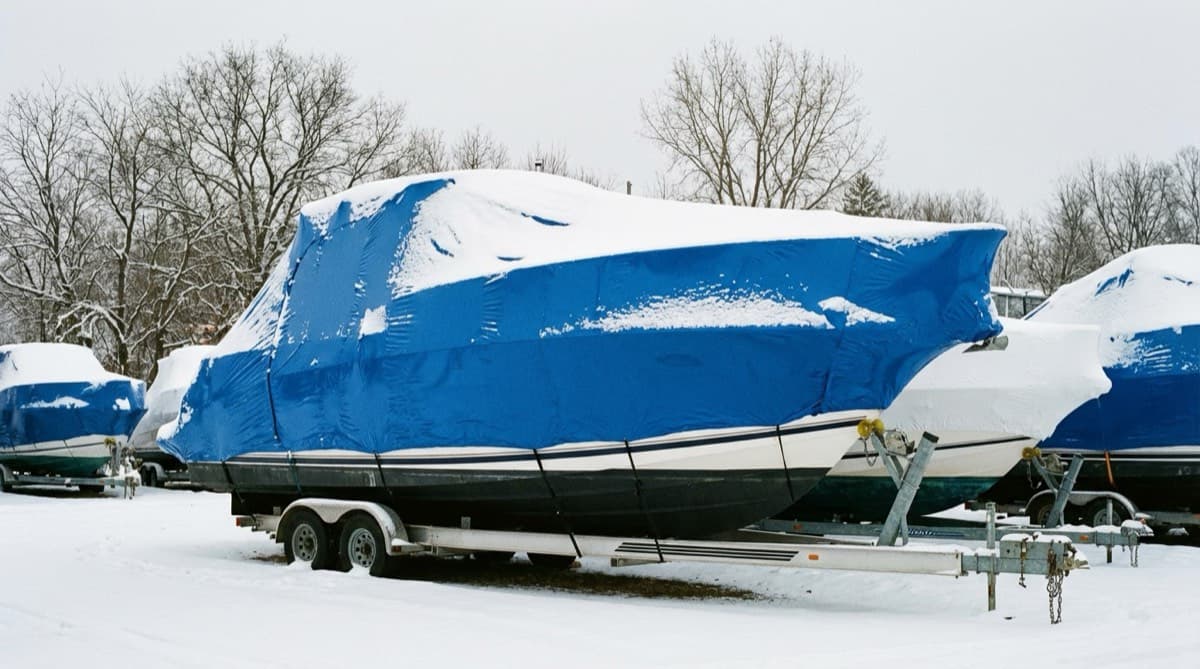
- Cover the boat with a fitted canvas cover or quality shrink wrap — shrink wrap provides the tightest seal and is the preferred method for boats stored outdoors in harsh winters
- Build a support frame under the cover to prevent water pooling in low spots that stretch and tear the cover fabric over time
Step 9: Pest Prevention
A warm, dry boat is prime real estate for mice, spiders, wasps, and carpenter bees during the off-season. Once pests establish themselves inside, the damage to wiring, upholstery, and insulation can be extensive.
- Seal all exhaust ports and air intakes with steel wool or foam pipe insulation — mice can squeeze through gaps as small as a dime
- Seal scupper drains and bilge vents the same way
- Place mothballs or peppermint-oil-soaked cotton balls inside the cabin — both deter rodents
- Set snap-style mouse traps inside the boat as a backup and check them periodically
- Inspect the boat every 4–6 weeks during storage if possible — catching an infestation early is far easier than dealing with a full nest in spring
Step 10: Choose the Right Storage Facility
Where you store your boat during winter makes a meaningful difference in how well it survives — and how much additional work you'll need to do to the exterior come spring.
| Storage Type | Protection Level | Typical Cost | Best For |
|---|---|---|---|
| Indoor/Enclosed | Excellent | $150–$500/mo | High-value boats, harsh winter climates |
| Climate-Controlled | Premium | $200–$650/mo | Boats with electronics, leather, fiberglass prone to cracking |
| Covered / Carport | Good | $75–$250/mo | Mid-range protection, moderate climates |
| Outdoor | Basic | $50–$150/mo | Budget option, mild winters, well-covered boats |
Search for boat storage facilities near you to compare options, pricing, and availability in your area. Book indoor storage early — units fill up by October in most northern markets.
Winterization Checklist — Complete Summary
- Flush and drain the engine completely (outboard, inboard, or sterndrive)
- Add non-toxic antifreeze to cooling system passages that can't fully drain
- Fill fuel tank to 95% and add marine-grade fuel stabilizer; run engine to circulate
- Run carburetor dry (carbureted engines only) after stabilizer treatment
- Change engine oil and filter; replace lower unit gear lube on sterndrives
- Fog engine cylinders with fogging oil
- Drain all freshwater systems; pump RV antifreeze through all lines and the head
- Disconnect and store batteries; connect a smart trickle charger
- Remove all food and organic matter from the cabin and bilge
- Deep clean the interior; leave lockers open; add moisture absorbers
- Wash, wax, and inspect the hull and topside
- Cover or shrink-wrap the boat; build a support frame under the cover
- Seal all openings against pests; place traps inside
- Choose and book appropriate storage facility
Following these steps will ensure your boat comes out of winter storage ready to launch — no expensive surprises, no engine damage, and no mold. Spring will be a lot more fun when you know your boat is already prepared.